Posts

Weekly Blog Final : Diner
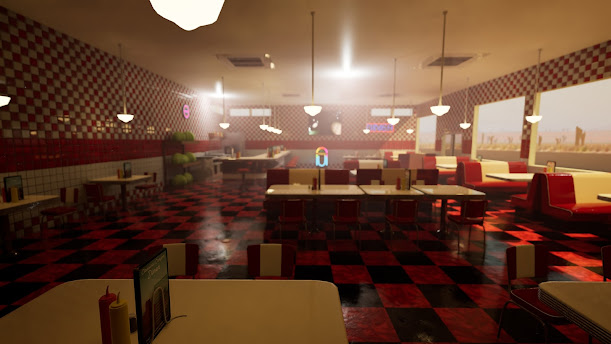
Image
  This video is rendered by Unreal Engine 5.5, using a plugin to export as mp4 "ffmpeg-7.1-full_build".     In the final week, I was creating some other props, lighting settings, and creating a level sequence to render video.          For the cactus, I was using curves and a loft tool to model the shape of the cactus. This process was nice to model a realistic and organic shape. For cabbage, I created a color with photoshop, exported it to Designer and merged it with the texture of  the small leaf veins, and created a normal map with histogram color.     To set up a level sequence, most of the settings are similar to the timeline setting of Unity. So I could set up without any problems.     For lighting in Unreal Engine, I added volume and height fog to express a light which comes from the outside. I changed the temperature in post processing volume.       Through this project, I challenged myself to so...

Weekly Blog 14 : Props and bush

Image
This week, I was working on textures of props and bush. These works took time rather than I thought, texture of black pepper and salt, and modeling of bush especially took time to finish up.   Fist thing I did is to make textures of black pepper and salt. I was trying to express it in Substance Painter, but there was a limit to do in Painter. For menu design, I did layout in Adobe Express (web service to make image). Photos of Monument Valley and foods are provided by Adobe Express images. I referred real diner menu to create the original layout.  Glass material of salt and pepper is not perfect yet, so I'll edit them next week. Next thing I did is also which I was struggling for. I created a bush object with Maya. I was referring a real grass in Monument Valley, it grows radically. I was looking for tutorials to create bushes, but most of them are about high poly bush and does not fit to my environment. So, I was carefully designing its shape in my original thinking. Its leaf...

Weekly Blog 13 : environment design for Unreal Engine

Image
 This week, I had enough time to work on the project because of Thanksgiving break. So, I worked on editing textures, Gaea terrain creation, and scene design in Unreal Engine. First thing I did this week was terrain modeling. Before I began generating the terrain model in Gaea, I defined the theme of landscape. I was thinking that it would be a wilderness area. I wanted to refer to the exact place, so I chose the reference landscape to the Monument Valley in Arizona and Utah.  This time, I exported terrain data as a height map, not as a static mesh. It reduces polycounts and is good for performance. If you choose Unreal node as export format, it will export a height map. These above images are about texture errors when they are sticking to each other. 1.red texture has a different position. 2.grunge scale is based on UV, so the size of them are different. 3.ambient occlusion  texture emphasizes the border. 4.Non-opacity pattern on opacity texture should be a decal. 5. Ins...

Weekly Blog 12 : Texture (continue)

Image
 This week, I have done texturing for all 9 materials, but there's still an issue on texture resolution. So, I may fix some UV shells next week. Anyway, I did not plan that the camera would zoom to these low-resolution textures. At this time, if I want, I am ready to make a scene and render in Unreal Engine.  My texturing finished earlier than I planned, so I will have extra 2 weeks (3 weeks including thanksgiving break) and I am planning to create a terrain object and bushes by using the next 2 weeks. I will use Gaea for a terrain object, but I have no plan to create nice bushes, I'll find a good way or use MegaScan. These images are not showing all textured objects, but these are almost all of the objects I worked on.  For a signboard, I planned to use normal maps and prepared texts, but I noticed that I can mask material with a font brush and edit height and color later. So I chose that option. In this project, I chose to use a height map to express some patterns, such...

Weekly Blog 11 : Texturing

Image
This week, I was working on texturing over a half of the materials. It is following the schedule correctly. To categorize what I did, in general, there are 3 things: fixing UV maps, layering materials in substance painter, and design in Substance designer. Material 1 For material 1, I fixed some UV shells to make the model be textured nicely. Sofa material, I combined leather texture and base texture to express the sofa texture by referring the images.  Material 2 For material 2, textures on top are used the same as the thing in Material 1. Metal surface is also unified with the other material. Material 3 and 4 (inside) Material 3 and 4(outside) For tiles on the wall, they are what I spent the most time in this week. First, I created 3 materials for the tiles in Substance Designer. I had a minimum knowledge about Designer because I studied nodes of Designer for the other project. So this was not too hard. But I did trial and error to create my original texture. First problem I face...

Weekly Blog 10 : Modeling and UV

Image
This week, I kept creating UV maps and some other objects.  I've done all UVs this week, so I can start texturing next 2 week. There are 8 materials in total, so I'll finish up 4 materials next week and 8 materials in the next 2 weeks. If  it is quickly done, I'll create a landscape object with Gaea (I have an experience in the other project) and create a HDRI backdrop in Unreal Engine. I can say that everything is on schedule this week, too. The first object which I created is a neon board. I used a curve tool and sweep tool to create tubes. I deleted extra edge loops and attached different materials. I did not create the UV map because I am planning to attach emission maps on them. If not, they just need solid colors. Other objects I created are the wall with doors, signboard, and the wall clock, left light-blue object and circle-shape object. Entrance object is based on the other wall objects.  The most powerful work this week was UV of these 3 objects. I especially fo...

Weekly Blog 9 : UV

Image
This week, I created 5 UV maps out of 6-7 materials (I'm going to add other objects and attach them to new material). I could focus on creating UV maps because I separated some meshes such that I could make UV easily.  I've almost finished creating UV maps, so I'll have time to create 2 more objects. It won't be too hard to create, suggestions are wall clock, neon board (just create curve and sweep) and wall with the door.  Counter objects are big and the player might watch carefully, so I created my own materials for them. If I combined it with other objects, smaller objects might look low-resolution. I was careful to keep the face-shape of UV. And I made the edges horizontal or vertical as possible as I could.   I did not use the align tool because I wanted to group the object UV shells close to each other. When I add textures on a 2D view, it can also be easy to edit the whole object if UV shells are close to each other. Of course, I am always careful with the tex...